In this article, with example of a multilingual website powered with xili-language trilogy, we present how to create a special language menu by using navigation menu features and some php code lines in header.php file of the theme.
On the top right, a language menu (1) is added to the default nav menu (2) in a div here named xili_language
Header file
<body <?php body_class(); ?>> <div class="wrapper"> <div class="page"> <div id="xili_language"> <?php echo '<div><ul>'; wp_nav_menu( array( 'container_class' => 'xl', 'theme_location' => 'languages_nav' ) ); echo '</ul></div>'; ?> </div> |
functions file
// This theme uses wp_nav_menu() in two (3 with if) locations. register_nav_menus( array( 'primary' => __( 'Primary Navigation', 'ipseite' ), 'primaire' => __( 'French Primary Navigation', 'ipseite' ), 'languages_nav' => __( 'Languages Navigation', 'ipseite' ), ) ); |
Style.css file
For this menu with container class ‘xl‘, some styles were created. Note especially that flags are managed as background and text drop in negative space ;-).
#xili_language { width: auto; color: #666; height:35px; padding:0px 0px 20px 0; } #xili_language .xl { font-size: 13px; line-height: 18px; margin:0; width: 100%; padding:0; height:35px; display: block; } #xili_language .xl ul { list-style: none; float:right; } #xili_language .xl li { float: left; display:inline; padding:1px 2px; } #xili_language a {color: #666; text-transform: uppercase; font-size: 10px; display: block; text-decoration: none; letter-spacing: 1px; } ul#menu-languages li.lang-fr_fr, ul#menu-languages li.lang-en_us, ul#menu-languages li.lang-de_de, ul#menu-languages li.lang-es_es {text-indent:-9999px; width:18px; } ul#menu-languages li.lang-fr_fr a {background: transparent url('images/flags/fr_fr.png') no-repeat center 5px;} ul#menu-languages li.lang-en_us a {background: transparent url('images/flags/en_us.png') no-repeat center 5px;} /* li#menu-xlang-separator a {display:none;} */ |
Dashboard: Appearance Menus
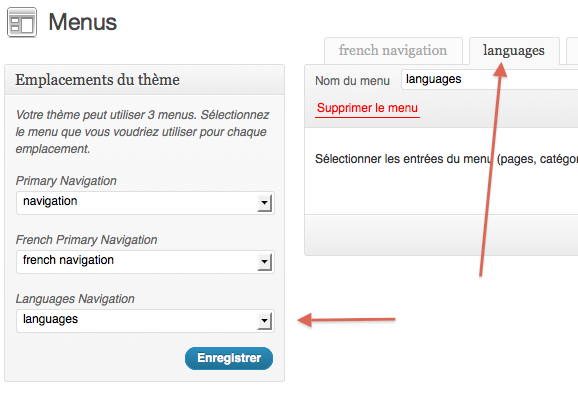
If the menu “location” is well declared in functions.php (see above), it is easy to “link” the menu to theme location. On right, a menu (leaved here empty) is saved under name languages.
Dashboard: xili-language settings
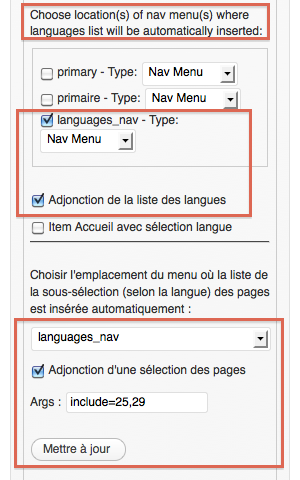
On the top, xili-language has detected that 3 locations are registered (see functions.php above). By checking, webmaster defines where languages menu is automatically inserted.
On the bottom, pages ‘contact us’ ‘nous contacter’ and are choosen according target language and automatically inserted before flags,.
(after checking, don’t forget to save settings)
COPYRIGHTS:
Ipseite website is owned by the Ipseite company involved in DAM (digital and media asset management).
The characters, figures and drawing created by Gerald Morales from WebOcube and co-founder of xiligroup team. Data-design: xiligroup.


Was wondering if you could give me a quick tip. I think your plugin is fantastic. I’ve employed the theme header details above but have a slight snag. My theme’s header calls to a primary nav with this code:
‘primary-menu’, ‘container’ => ”, ‘fallback_cb’ => ”, ‘menu_class’ => $menuClass, ‘echo’ => false ) );
}
if ($primaryNav == ”) { ?>
<ul class="”>
<li ><a href="”>
How would I edit this code for my Italian menu (alternative language menu)? Any help would be greatly appreciated.
Thanks,
Marco
before to send you a deeper answer, don’t forgot to read the code of twentyeleven-xili child theme.
Thanks for this article! It is one of the few that are formed as step-by-step instructions, and I was actually able to follow along 🙂
There are however a few problems with the article. I have tried to clean up the article a bit, however I only have very basic knowledge of PHP and WordPress, and English is not my mother language either, so there may be mistakes here also.
The menu is not “added to” another menu. This should possibly have been
Functions file
Add the following code to your functions file (functions.php). It creates an additional language navigation menu to place the language choices in.
If you want to, you can localize the “Language Navigation” menu title. (It shows up in the configuration dashboard.) This will however require the creation of a localization file. For more information, see http://codex.wordpress.org/Translating_WordPress.
Note that for sake of logic, it’s best to start with modifying the functions file since all further actions depend on this modification. I removed the “primaire” menu from the example, since it seems to me it is not relevant to the instructions. I also removed the “s” from “languages”, I think that is the proper English writing. I have no clue what the remark in the comment refers to. Also including the localization code from the “ipseite” project is a needless complication.
Menu creation
Log into the administration area and open the Menus page (under Appearance). If the previous edit of the functions file was successful, an additional menu location should now be available. Create a new menu, for example “Languages”. Leave the menu empty!
Note: “Dashboard” is only the name of first screen in the administration area, not of the whole. (See http://codex.wordpress.org/Glossary#Dashboard.) And again, for the sake of logic, this should be the second part.
Filling the menu
Under Settings, open the Languages page, followed by the “Settings for experts” subpage. Under “Nav menu: Home links in each language”, put a checkmark in front of “language_nav”. (This is the menu name you defined in the functions file.)
If you want to put links to additional pages in the menu, then select the “language_nav” menu from the dropdown menu under “Nav menu: Automatic sub-selection of pages according current language”. Put a checkmark in front of “Add selection of pages in nav menu” and write the code
include=plus the page IDs for the pages that you want added. Add the IDs of the pages in all languages, only the ones in the current language will be shown in the menu.Note: This one was difficult to find. There was no information where to find the page, and the screenshot is significantly different from the page I get to see. (Not just a different language.) The possibility to add links to pages to the language menu is confusing; the language switches themselves are always visible, while the visible page links depend on the choosen language. Also, this system seems to make it impossible to add pages to more than one language menu.
Header file
The header file is not included in the downloadable Twenty Eleven-xili theme. It first has to be copied over from the full Twenty Eleven skin.
Add the following code to the header file (header.php), placed after the opening
headertag and before the openinghgrouptag. Please note that the'language_nav'value corresponds to the name defined in the functions file.... 'language_nav' ) ); ?> ...Note that the code in the original example does not follow the code from the Twenty Eleven theme. I also removed several parts again. The nested
divtag had no added value to the one named “xili_language”. Thewp_nav_menufunction automatically adds anultag, so hard-coding that here created a nestedul. Thecontainer_classparameter is also unneeded, since the “xili_language” ID is specific enough.Stylesheet file
Add the following code to the stylesheet file (style.css).
#xili_language ul {
   float: right;
   list-style: none;
}
#xili_language li {
   display: inline;
   float: left;
   margin: 2px;
}
This will put the menu in the top right corner of the page.
Note: I removed the .xl class since that element was redundant and removed, and replaced the padding with a margin for better support of the background images. (Backgrounds continue under the padding, not under the margin.)
To replace the textual language links with flag images, add the following code.
#xili_language {
   line-height: 11px;
}
#xili_language a {
   display: block;
}
#xili_language .menu-item-type-custom {
   text-indent: -9999px;
   width: 16px;
}
#xili_language li.lang-en_us a {
   background-image: url('images/flags/en_us.png');
}
The values for
line-heightandwidthshould correspond to the width and height of the images used (11×16 for the included default images).Repeat the following block for every language used in your blog, replacing
xx_yywith the appropriate language code.#xili_language li.lang-xx_yy a { background-image: url('images/flags/xx_yy.png'); }Lots of code optimizations here, I removed several lines that contained default values, combined groups where possible, and replaced repetitions of
li.lang-xx_yywith the general.menu-item-type-custom.Finally, some styling can be applied:
#xili_language { color: #666; font-size: 10px; padding-bottom: 20px; } #xili_language a { color: #666; letter-spacing: 1px; text-decoration: none; text-transform: uppercase; }The code for the header file did not come out right. (Why is there no preview or edit possibility?) It should have been:
   ...
   <header id="branding" role="banner">
      <div id="xili_language">
         <?php wp_nav_menu( array( 'theme_location' => 'language_nav' ) ); ?>
      </div>
      <hgroup>
         ...